As a coffee enthusiast, there’s nothing quite as disheartening as pulling an espresso shot only to discover it’s under-extracted. I still remember one of my first attempts—eagerly watching as the shot poured, my excitement quickly turned into disappointment when I tasted the result. It was sour, thin, and utterly lacking the rich complexity I craved. I spent weeks experimenting, feeling both frustrated and fascinated by how a seemingly small tweak could make such a difference. Through countless trials, I finally learned the key steps to fixing under-extracted espresso. Let me share what I discovered, so you can avoid those same pitfalls.
What is Under-Extraction?
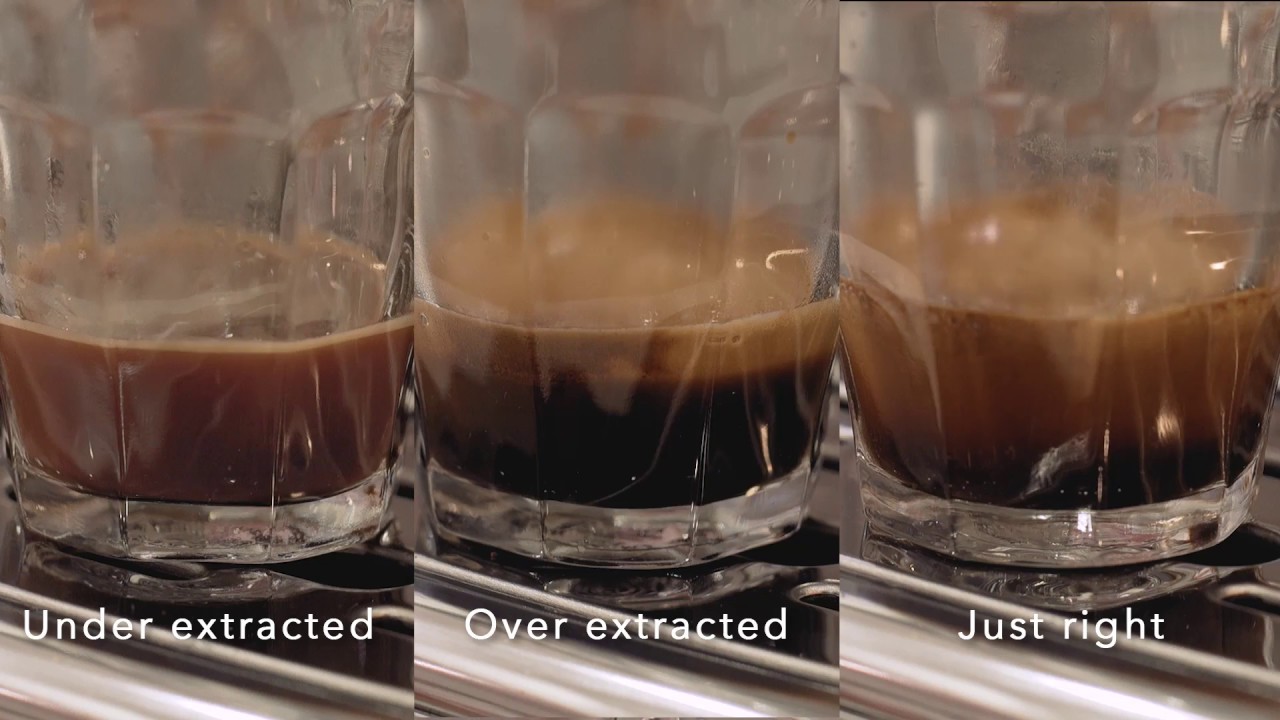
Before diving into the solutions, it’s important to understand what under-extraction actually means. Under-extraction occurs when water passes through the coffee grounds too quickly, failing to properly draw out the rich, balanced flavors of the coffee. As a result, the espresso tastes sour, weak, and acidic. It’s the opposite of over-extraction, which results in a bitter, overly strong shot. The goal is to find that perfect middle ground.
Signs of under-extracted espresso include:
- Sour or sharp acidity: The sourness tends to be harsh rather than pleasantly bright.
- Thin body: A well-extracted espresso should be rich and velvety. If it’s watery, it’s likely under-extracted.
- Pale crema: A thick, golden-brown crema is the mark of a good shot. A pale, thin crema suggests under-extraction.
Now that we understand what’s happening, let’s explore how to solve it by adjusting several key factors.

Adjust the Grind Size
Grind size is one of the most crucial aspects affecting espresso extraction. Espresso requires a very fine grind, and if your coffee grounds are too coarse, water will flow through them too quickly, leading to under-extraction.
When I first started, I underestimated how much impact grind size had on my espresso. If your shot is tasting sour or thin, the first thing you should try is adjusting the grind size to be finer. A finer grind increases the surface area exposed to the water, which means more flavor is extracted. Just remember—make small, incremental changes, as grinding too fine can lead to over-extraction and a bitter taste.
Tip: Adjust your grind size slightly and taste each shot to identify improvements. It might take a few tries, but you’ll eventually find the sweet spot.
Adjust Your Brew Ratio
Another important factor in fixing under-extracted espresso is your brew ratio—the amount of coffee grounds compared to the amount of espresso yield. A typical espresso ratio is 1:2, meaning 18 grams of coffee should produce around 36 grams of espresso. If your shot is under-extracted, you might be using too little coffee or too much water.
When I struggled with under-extraction, changing the brew ratio was a game-changer. Try increasing the dose of coffee grounds, or reduce the final yield to create a more concentrated shot. Weighing both the coffee and the final espresso using a small scale can give you greater consistency.
Check Your Water Temperature
Water temperature plays a critical role in espresso extraction. If the water is too cool, it won't fully extract the coffee’s flavors, resulting in an under-extracted shot. Ideally, water temperature should be between 195°F and 205°F (90°C to 96°C).
At one point, I realized that my espresso machine wasn’t reaching the right temperature, and that’s when I understood why my shots were consistently sour. If your machine doesn’t have a temperature control, make sure it’s thoroughly warmed up before pulling a shot. For machines with adjustable settings, try raising the temperature a few degrees until you find the perfect balance—just be careful not to go too high, as overly hot water can lead to over-extraction.
Refine Your Tamping Pressure
Tamping—the process of compressing the coffee grounds into the portafilter—is another critical step. If you tamp too lightly, water will pass through too quickly, leading to under-extraction. On the other hand, tamping too hard can cause over-extraction.
In my early days, tamping was an afterthought. I didn’t realize just how important it was. Aim to apply about 30 pounds of pressure when tamping, enough to create an even and compact bed of coffee grounds for the water to pass through uniformly. To practice, try using a bathroom scale and pressing until you reach 30 pounds. It sounds tedious, but it makes a huge difference in your espresso quality over time.
Adjust Shot Time
Shot time—the time it takes for your espresso to brew—is another key factor to watch. Ideally, your espresso should brew for 25 to 30 seconds. If your shot pulls too quickly (under 20 seconds), it’s likely under-extracted.
To slow down shot time, try grinding your coffee finer, tamping more firmly, or increasing the coffee dose. These adjustments can help the water flow more slowly, allowing more time for extraction.
I used to underestimate how much shot time impacted flavor, but now I always monitor it. If my espresso pulls too fast, I know it’s time to make an adjustment.
Fresh Coffee is Key
One often overlooked aspect of espresso extraction is the freshness of your beans. Coffee beans lose flavor as they age, especially after roasting. If your beans are stale, it’s almost impossible to achieve good extraction.
I remember when I used to leave my beans sitting in the cupboard for months—unaware that this was sabotaging my shots. Freshly roasted beans (within two weeks of roasting) will contain the necessary oils and solubles to extract properly. Now, I make sure to use only fresh beans, and the difference is night and day.
Practice and Patience
Finally, perfecting your espresso is a matter of practice and patience. Every machine is different, and every batch of beans can behave differently. Don’t get discouraged if it takes some time to get it right—consider it part of the process. With each adjustment, you’re learning and getting closer to that perfect shot.
Conclusion: Achieving the Perfect Shot
Fixing under-extracted espresso is all about understanding and fine-tuning the different variables—from grind size, brew ratio, and water temperature, to tamping pressure and shot time. Though it can feel overwhelming at first, each small adjustment can lead to big improvements in flavor. Don’t be discouraged by the occasional sour shot; instead, treat it as a valuable learning opportunity.
From my own experience, even minor tweaks can transform your espresso. With focus and dedication, you’ll soon be able to pull shots that are rich, balanced, and worthy of your favorite coffee shop. Happy brewing!
Frequently Asked Questions
Q: What does under-extracted espresso taste like?
A: Under-extracted espresso typically tastes sour, sharp, and thin. It lacks sweetness and complexity and may have a pale crema.
Q: How do I know if my grind size is too coarse?
A: If your shot is pulling too quickly (under 20 seconds) or if the espresso tastes sour and watery, your grind size is likely too coarse. Try making the grind finer to improve extraction.
Q: What is the ideal shot time for espresso?
A: The ideal shot time for espresso is between 25 to 30 seconds. If the shot pulls faster, it could be under-extracted; if it’s too slow, it may be over-extracted.
Q: Why is water temperature important in espresso extraction?
A: Water that is too cool won’t extract all the flavors, resulting in under-extraction. The ideal temperature range is 195°F to 205°F (90°C to 96°C) to ensure optimal extraction.
Q: How can I practice consistent tamping pressure?
A: You can use a bathroom scale to practice tamping to 30 pounds of pressure. Consistent tamping is crucial for even extraction and better espresso quality.